 Foody Pocket POS User Manual
Foody Pocket POS User Manual
This manual explains how to operate the "Foody Pocket POS" app, which runs on Android devices, step by step from installation through initial setup, daily order taking and settlement, and the handheld device. It can be viewed on either a tablet or a smartphone.
IntroIntroduction
This manual describes how to operate the POS app "Foody Pocket POS", which runs on Android devices. It covers order taking and settlement at the POS register, eat-in (in-store) orders, order management for take-out and self-delivery, cash management, and order taking on the handheld device.
Product (menu) registration and the basic settings for taxes, stores, and so on are performed in the separate "Backend Console User Manual". Content already registered in the console is linked to and displayed in this app.
System Requirements
| Item | Details |
|---|---|
| POS register device | An Android OS tablet device (recommended). Used in landscape orientation. |
| Handheld device | An Android OS smartphone. Used by staff to take orders at the table. |
| How to obtain | Search for "foodypocket POS" on Google Play and install it (Chapter 1). |
| Printer | A LAN-connected receipt/slip printer is recommended (see 4.2). |
| Payment terminal | Supports the EFT PAY payment terminal in Hong Kong, and STORES payment (POS-linked) domestically. |
How to Read the Screens
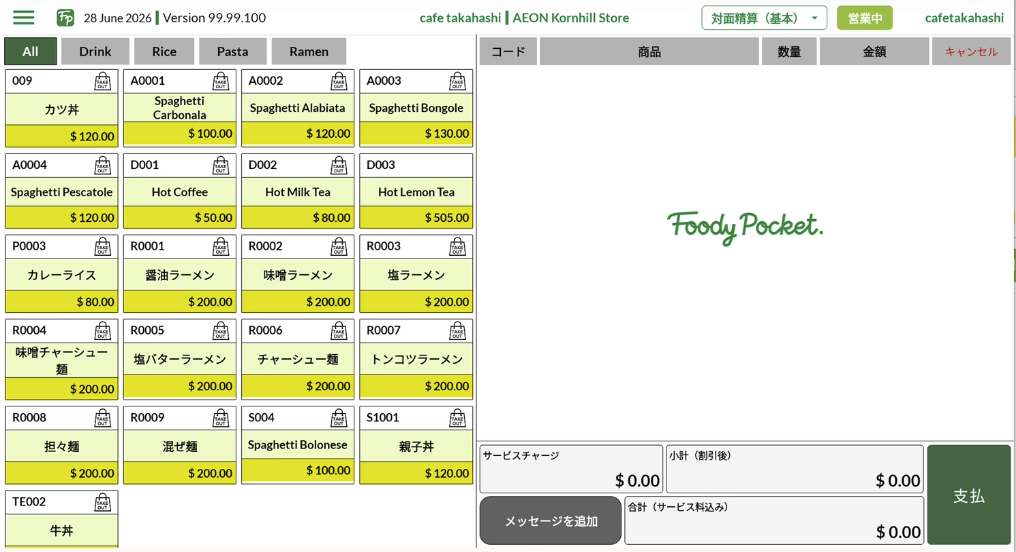
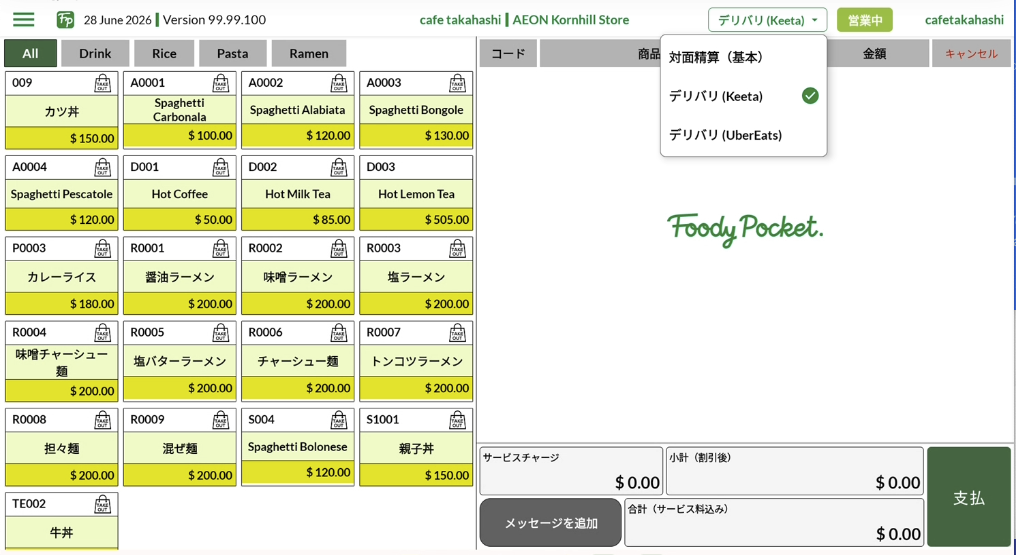
The POS register screen consists of a green top bar at the top (≡ menu, date, version, store/branch name, business status, logged-in user name), the menu area on the left (product tiles), and the selection list area and calculation area on the right. Details of each screen are explained from Chapter 5 onward.
Ch.1Installing the App
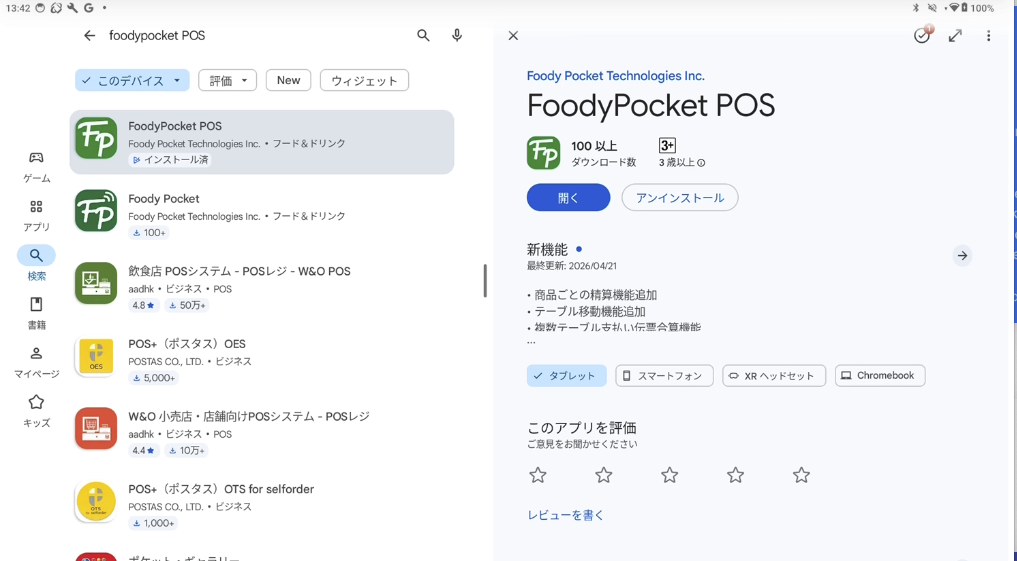
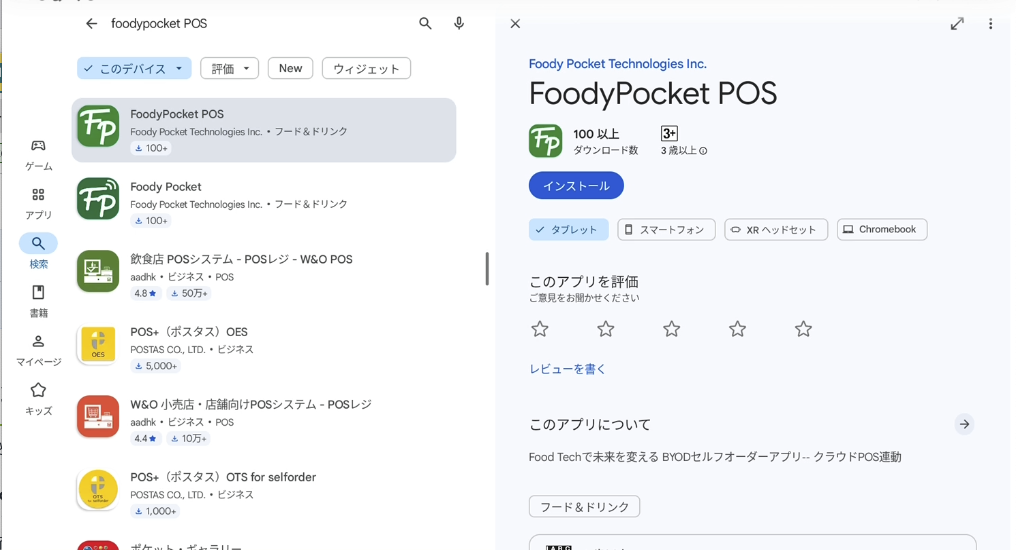
Both the POS device and the handheld device obtain the app from Google Play.
- Search for "foodypocket POS" on Google Play and tap [Install].
- Once installation is complete, tap [Open] to launch the app.
Ch.2Logging In
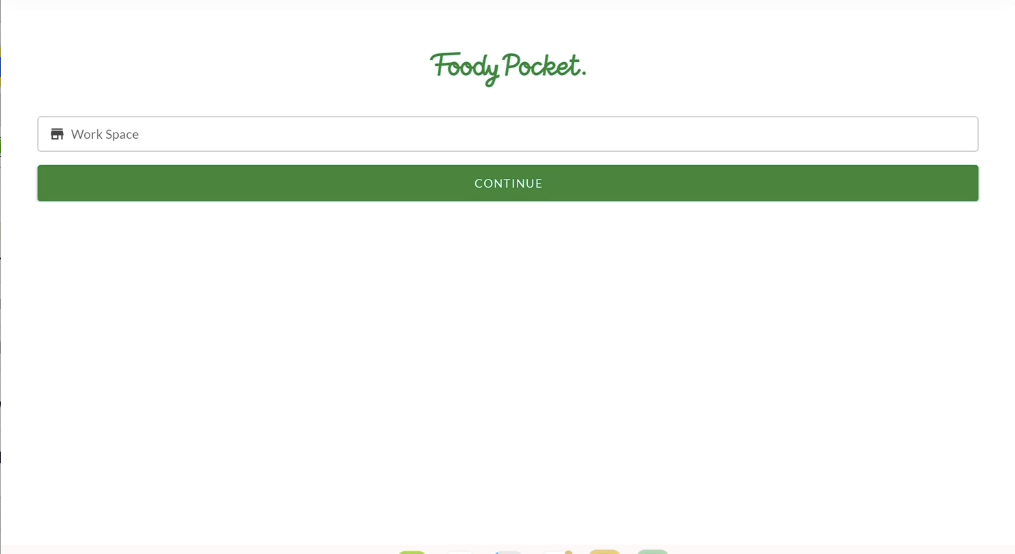
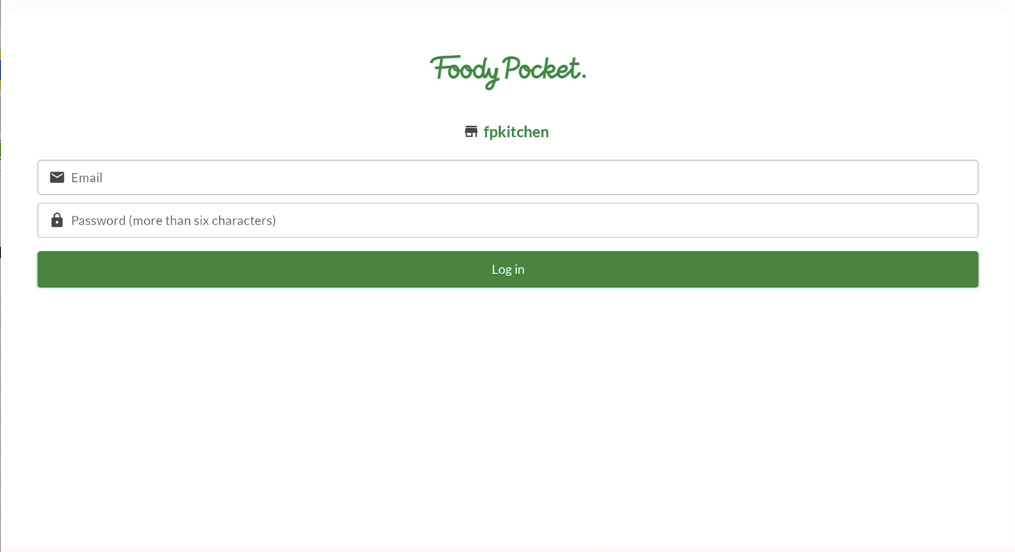
To log in to Foody Pocket POS, you need the following three pieces of information.
| Item | Description |
|---|---|
| Work Space name | The account identifier for the store (business). |
| Login ID | The registered email address. |
| Password | A password of at least 6 characters. |
- Enter the "Work Space" name, then tap [Continue].
- Enter your "Login ID" and "Password", then tap [Log in].
Ch.3Navigation Menu
The navigation menu is the ≡ icon at the top left of the screen. It is the menu used to switch between the main screens.
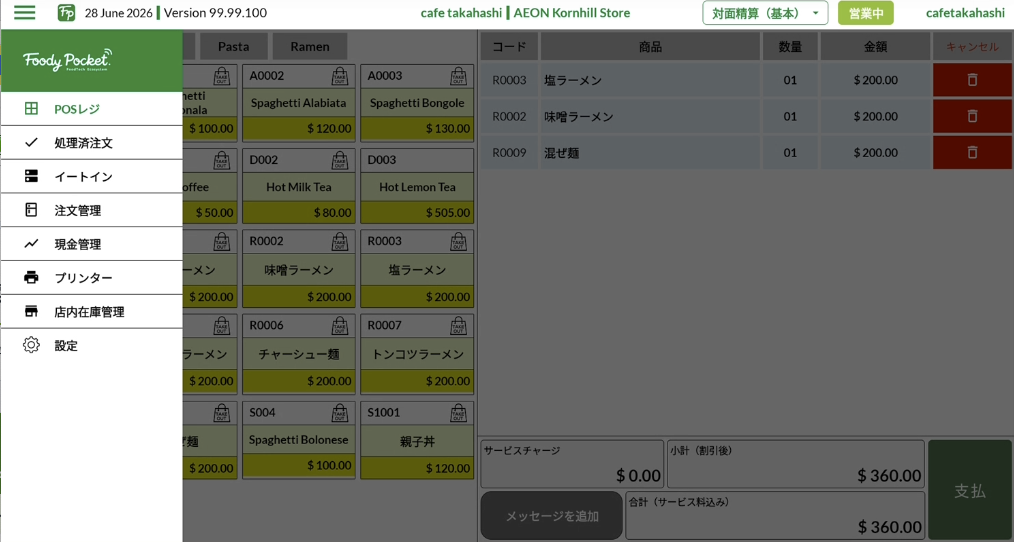
| Item | Description |
|---|---|
| POS Register | Used when staff take orders face-to-face with customers, such as in self-service operations. |
| Processed Orders | Used to review or cancel completed orders. |
| Eat-in | Used for in-store (eat-in) orders in full-service restaurants, linking the table number to the customer when taking an order. |
| Order Management | Used as the standby screen for receiving take-out and self-delivery orders. |
| Cash Management | Used to record and manage the cash status before opening and after closing, in order to manage the cash drawer. |
| Printers | Used for all printer settings, including category-based assignment settings. |
| In-shop Inventory Management | When you select products that cannot be provided on the business day, this hides those products from the POS register and the mobile order. |
| Settings | Used to configure language selection (Japanese, English, Chinese), registration of the EFT PAY Hong Kong payment terminal IP address, chime sound on/off, self-delivery service on/off and detail review, store selection, reset, and sign out. |
Ch.4Initial Setup
Before you start business operations, configure the initial settings for language, printers, and cash.
4.1Language Settings
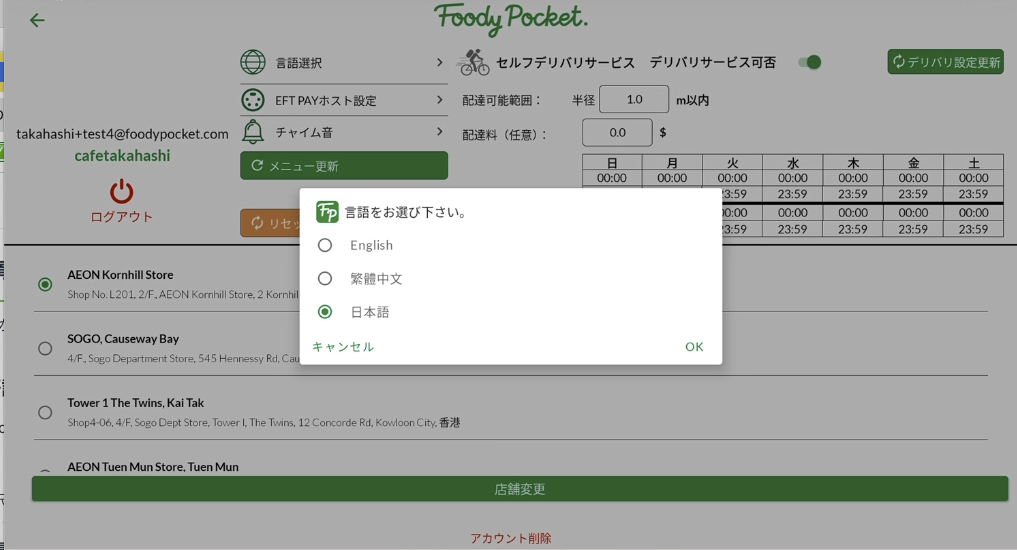
When you log in to Foody Pocket POS, the display defaults to English, so you need to switch it to "Japanese" (or your preferred language).
- From the navigation menu, select [Settings].
- Tap "Change Language", select your language, and tap [OK].
4.2Printer Settings
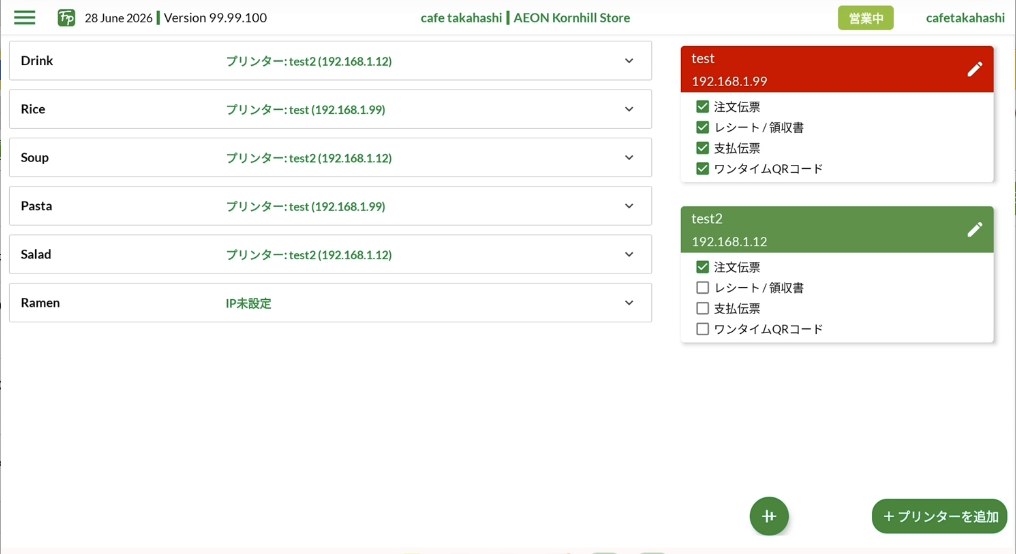
You need to configure the printer assignment settings in advance. From the navigation menu, select [Printers].
4.2.1 Registering a Printer
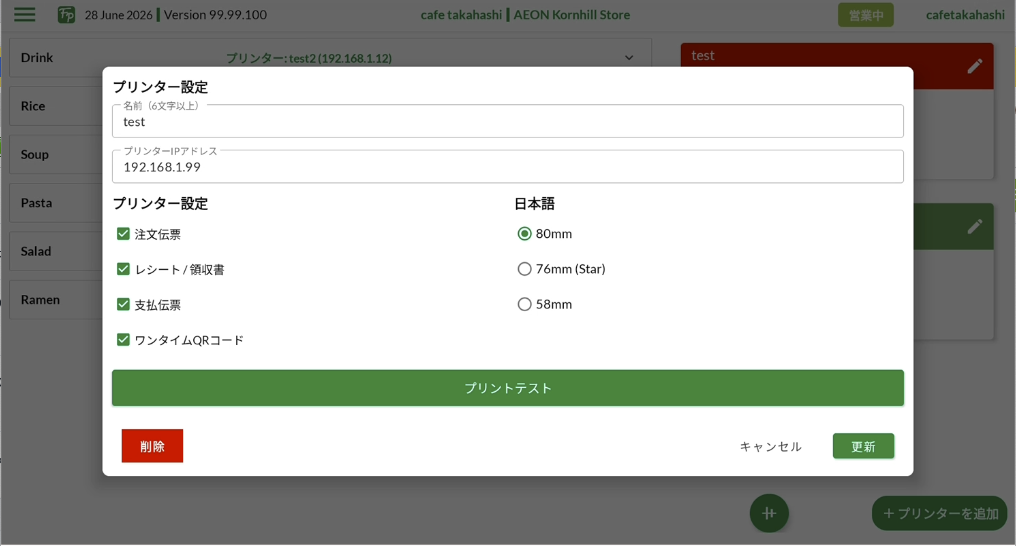
- Tap [+ Add new Printer] at the bottom right to add a printer.
- Enter the "Printer name" and "Printer IP address". Then try tapping [Print Test]. If the printer is connected, a test print will be output.
- For that printer, select one of "Order Slip", "Receipt/Official Receipt", "Bill", or "One-time QR code". You may select all of them with no problem.
- When you are satisfied, tap [Add] to close.
4.2.2 Printer Assignment Settings (by Category)
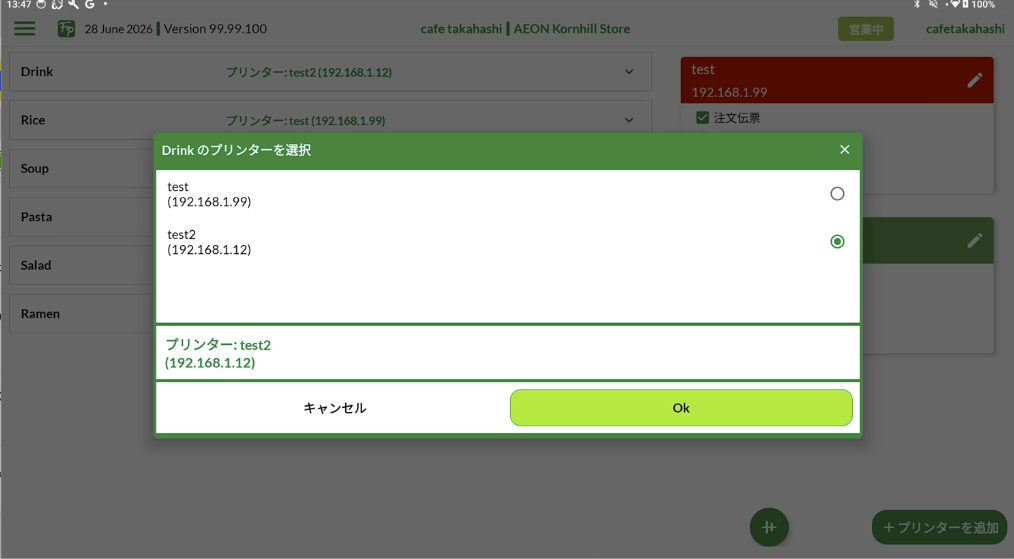
Assign which printer outputs the products of which category, on a per-category basis. (Assignment was previously done per product, but it is now configured by category.)
- On the Printers screen, choose the category you want to configure from the category list.
- Select the printer for that category. You can specify a main (primary) and a secondary (sub) printer (screen display: "Select printer for [category name]").
- Once selected, the assignment is shown for the category as "Main: [name] / Secondary: [name]".
- When you have finished, tap [Update] to save.
4.2.3 Deleting a Printer
To delete a printer, tap the edit button ✎ at the top right of the printer box, then tap [Delete]. The printer will be deleted.
4.2.4 Various Print Output Settings
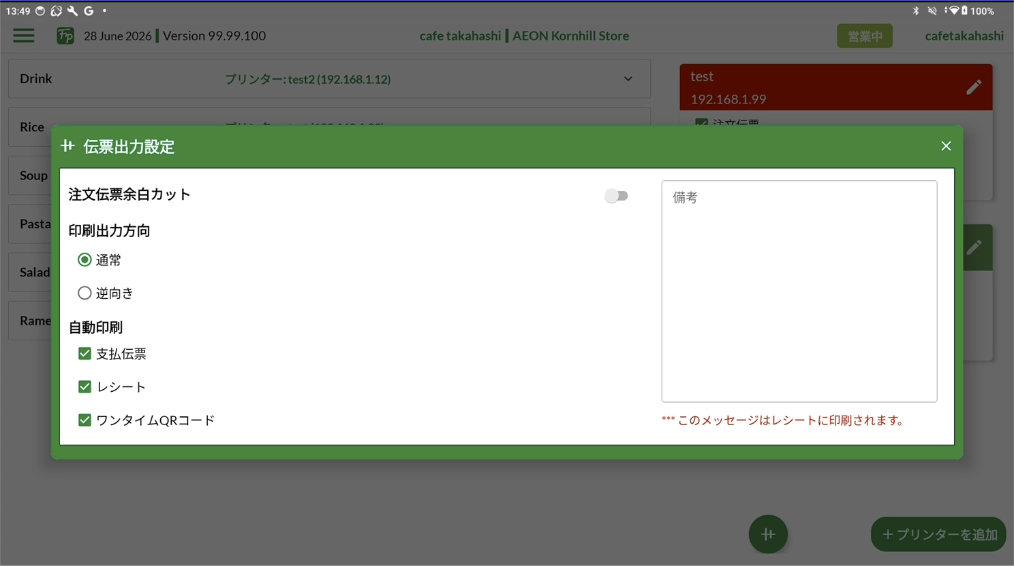
You can configure the order slip output in detail. To configure the various output settings, tap the + button at the bottom right of the screen. The "Print settings" dialog will appear.
<Remove order slip margin>
When you turn on "Remove voucher margin", the top and bottom margins of the order slip are cut to a minimum, saving paper.
<Order slip print direction>
You can set the print direction of the order slip (normal / reversed). Adjust it to match the orientation in which the printer is installed.
<Automatic printing>
Bills and receipts can be output automatically.
- The bill is output automatically when an eat-in order is placed.
- The receipt is output automatically when payment is completed at the POS register or in eat-in.
4.3Cash Settings
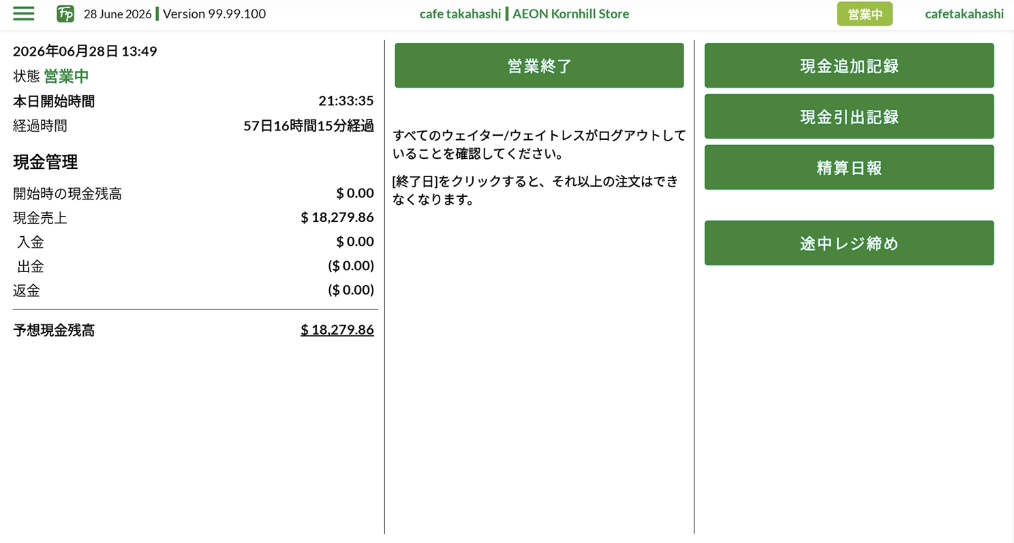
Cash management is used to manage the cash that goes in and out of the cash drawer (register). From the navigation menu at the top left, select [Cash Management].
4.3.1 Opening the Register (to do before business)
- At the start of business, tap the [Start Day] button.
- Check the amount in the cash drawer (open cash position), and if it is correct, tap [Yes]. This completes opening the register, and you are ready to start business.
4.3.2 Putting the Change Float into the Drawer
When you put a change float into the drawer, you need to register the amount.
- Tap the [Add Cash] button.
- Enter the number of notes/coins for each denomination, then tap the [Add Cash] button again. This completes registration of the change float. The entered amount is reflected in "Cash deposits" in cash management.
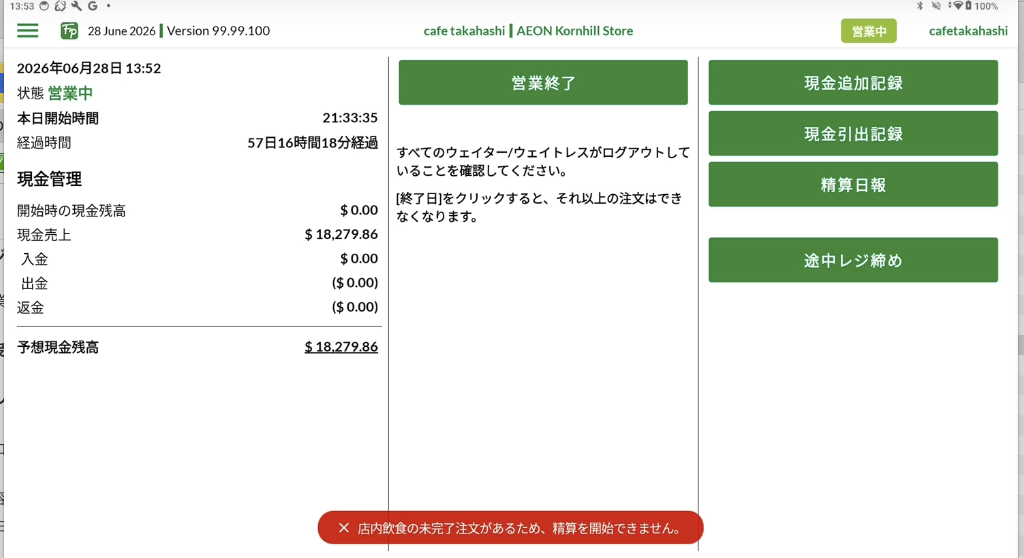
4.3.3 Closing the Register (to do after business)
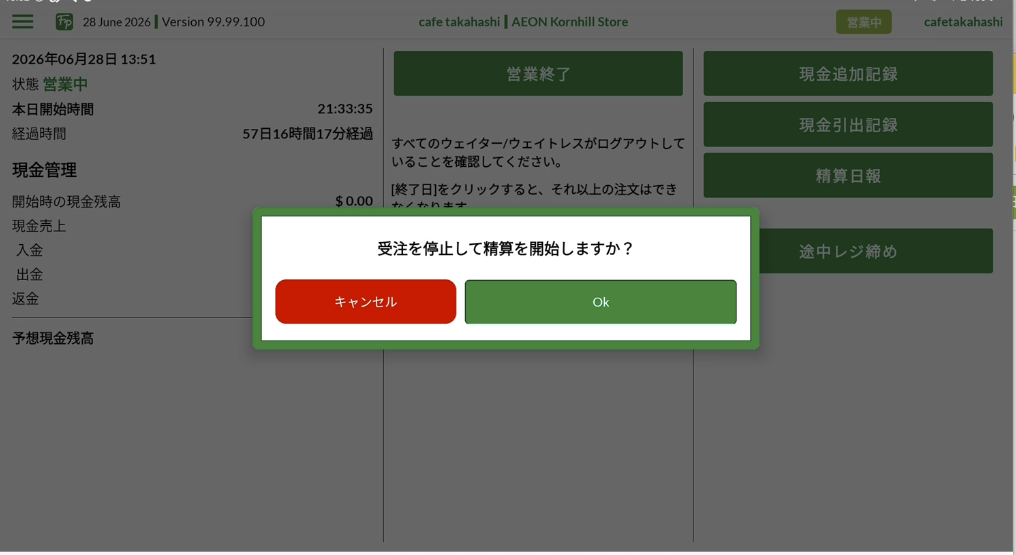
- When business is finished, tap the [End Day] button.
- You will be asked "Are you going to stop receiving order and start count up?", so tap the [OK] button.
- Tap the [Declare Tender] button.
- Enter the denominations and counts in the drawer, then tap the [Declare Tender / Submit] button.
- Review the details, and if there are no problems, tap the [Yes] button. If a discrepancy arises, clearly note the reason in the remarks field.
- When register closing is complete, the closing balance is displayed. This completes closing the register.
4.3.4 Withdrawing Cash from the Drawer
- After business closes, or when cash is needed during business, always perform a [Withdraw Tender] registration when withdrawing cash from the drawer.
- Enter the denominations and counts withdrawn, then tap the [Withdraw Tender] button.
- Check the total withdrawal and the carried-over balance, and if there are no problems, tap [Yes]. The figure is reflected in "Cash withdrawals" in cash management.
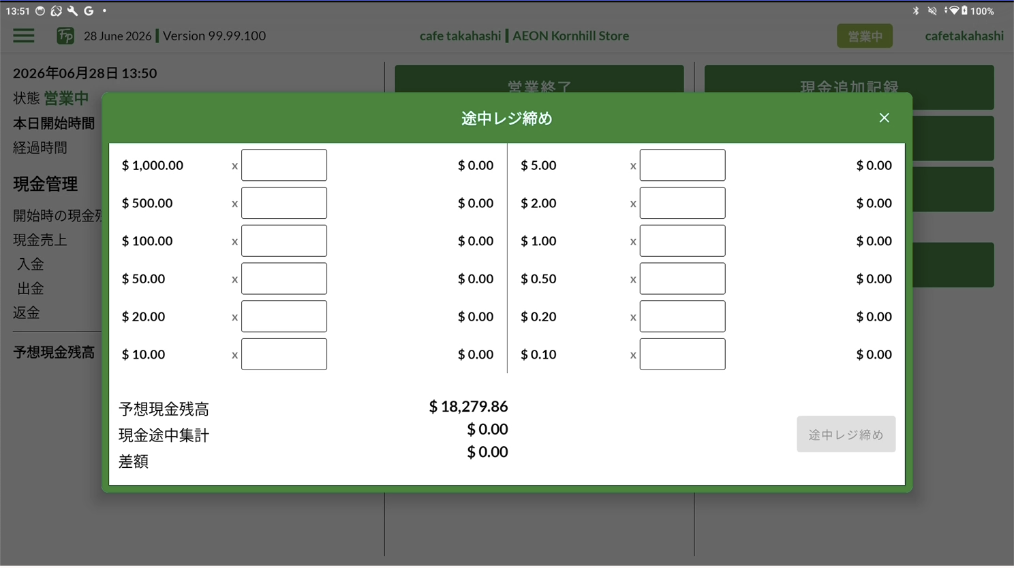
4.3.5 Pre-Declare Tender Function
When you want to settle the register during business, the pre-declare tender function is useful. When you tap the [Pre-Declare Tender] button, you can close the register (check the cash in the drawer) in the same way as a full register close.
4.3.6 Outputting the Settlement Daily Report
You can output the "Settlement Daily Report", which records sales, the average spend per customer, and so on.
- Tap [Settlement Daily Report], review the contents, and tap [Print]. The daily report will be output from the printer.
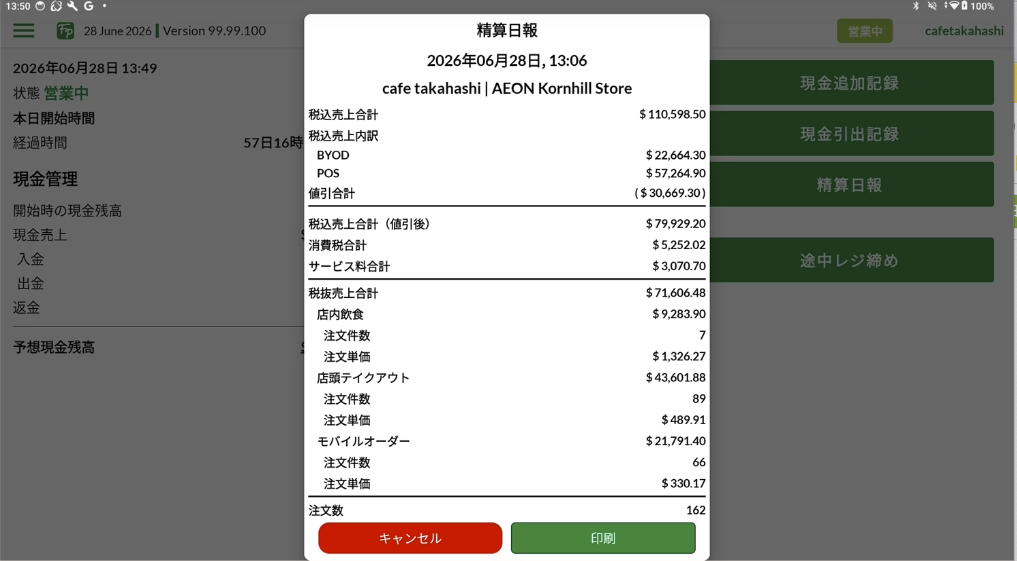
The Settlement Daily Report prints the total sales including tax (breakdown by BYOD / POS / individual), total consumption tax, total service charge, the order count and unit price by order type (eat-in / counter take-out / mobile order), the consumption tax breakdown, the breakdown by payment method (cash / credit / QR code / QUICPay / iD / transportation IC, etc.), the cash balance after closing business, and more.
Ch.5POS Register
The POS register is used in fast-food (self-service) operations, food courts, food trucks, and other situations where staff take orders face-to-face with customers. It is not used in full-service operations.
5.1Screen Components
 1
2
3
4
5
6
7
8
9
10
1
2
3
4
5
6
7
8
9
10
5.2Selecting Products
Using the POS register is very simple.
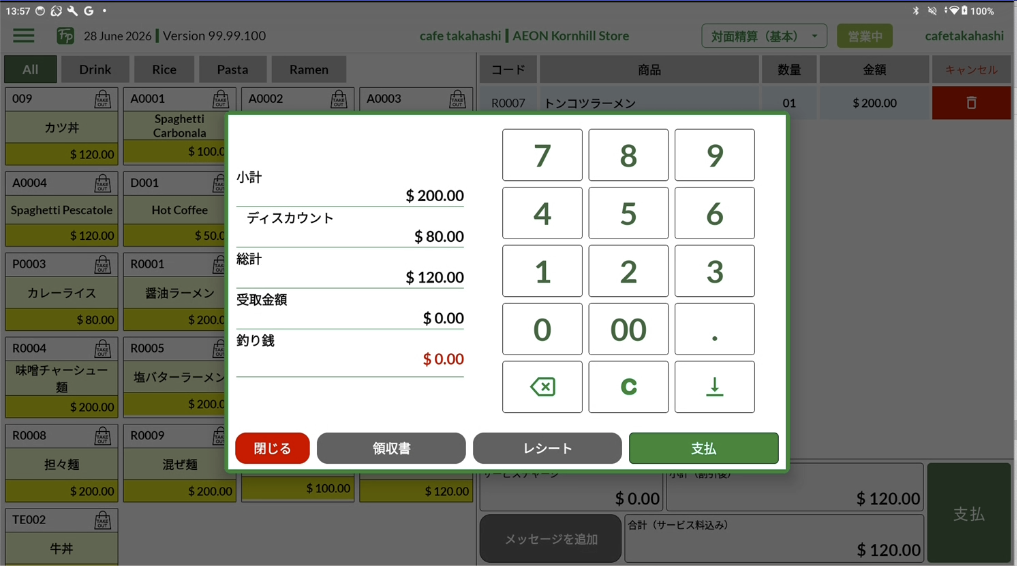
- When you select a product from the menu on the left half, the selected product is listed on the right half.
- To change the quantity, tap the quantity figure. A number dialog appears. Enter the quantity and tap [Done].
- For items eligible for the reduced tax rate, such as take-out or self-delivery, tap the "TAKE OUT" icon in the tax column. The reduced tax rate will be applied.
- To cancel an order, tap the trash icon. You will be asked "Are you sure you want to remove this?", so tap [OK].
5.3Applying Discounts
You can apply discounts that you have set up in advance in the backend, in a variety of ways.
<How to apply a discount to the entire sale>
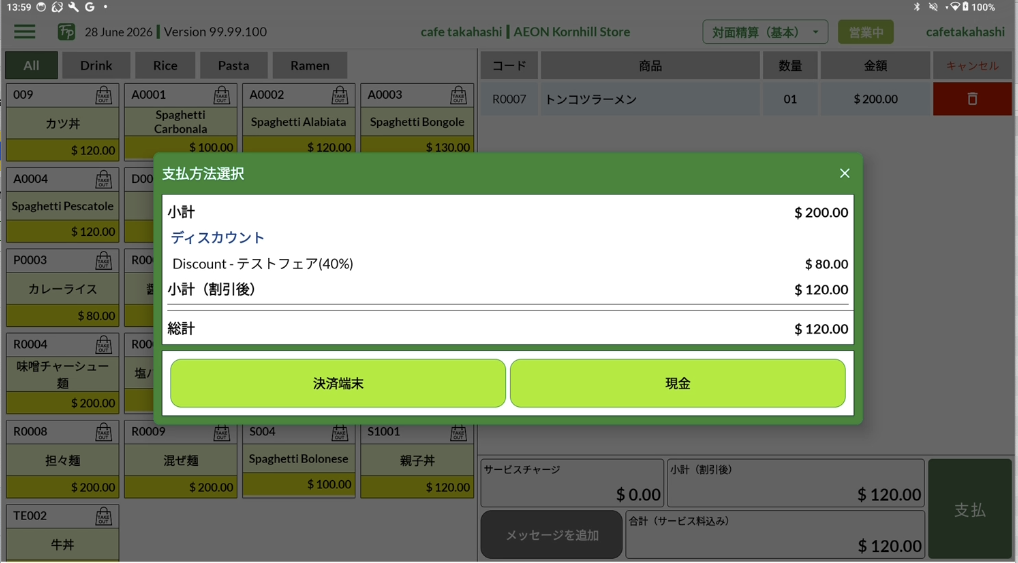
- At POS register settlement, tap the [Pay] button at the bottom right.
- The payment dialog appears. Tap the blue "Discount" link.
- The discounts set in the console are displayed. Select the discount you want to apply and tap the [Apply] button to complete.
- The discount is applied, and the discounted subtotal is shown in the payment dialog.
<How to apply a discount to an individual product>
- At POS register settlement, tap the name of the individual product you selected.
- The dialog with the discount list set in the console appears. Select the one you want to apply and tap [Apply].
- The applied discount is displayed, and the discounted subtotal is shown in "Subtotal (after discount)" at the bottom of the screen.
5.4Payment Processing
- Review the products and figures, and if there are no problems, tap [Pay] at the bottom right to proceed to the payment screen.
- To apply a preset discount, tap "Discount" and select from the discount list to apply it.
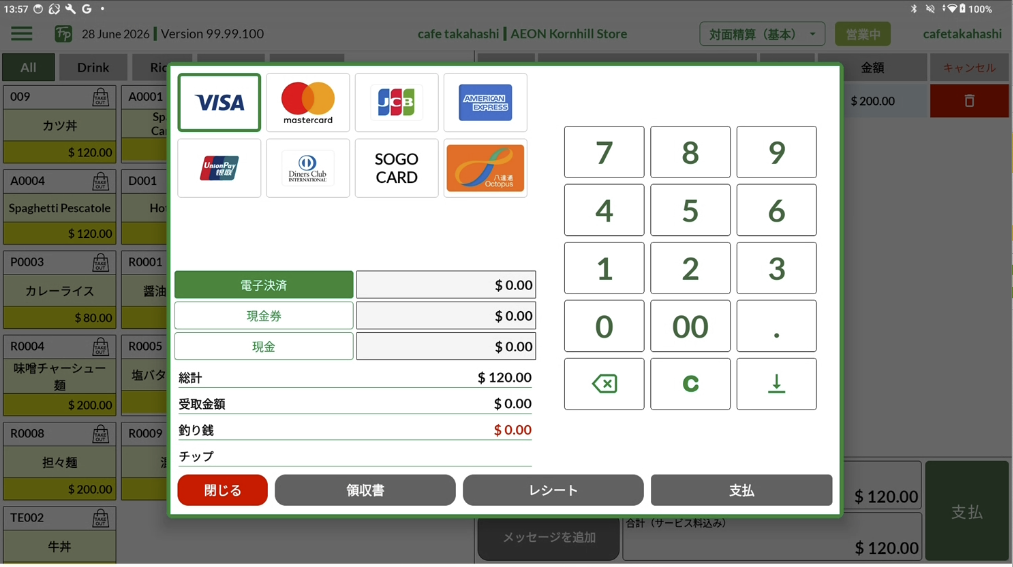
- If there are no problems with the settlement details, select the payment method "Cash" or "Payment Device".
- To pay by cash, tap the [Cash] button. If there are no problems with the details, tap [Pay]. When this button is tapped, the order slip is output.
- Once payment is complete, tap [Receipt] to output it and hand it to the customer. When settlement is complete, tap [Close] to close the dialog.
- To use cash together with multiple payment methods, tap [Payment Device]. Select the payment method and enter the amount. For example, for payment by PayPay, select "QRCode Payment" and tap the ↓ to its bottom right. The payment amount is entered automatically. When entry is complete, the [Pay] button becomes active (highlighted), so tap it. At that point, the order slip is output.
Ch.6Processed Orders
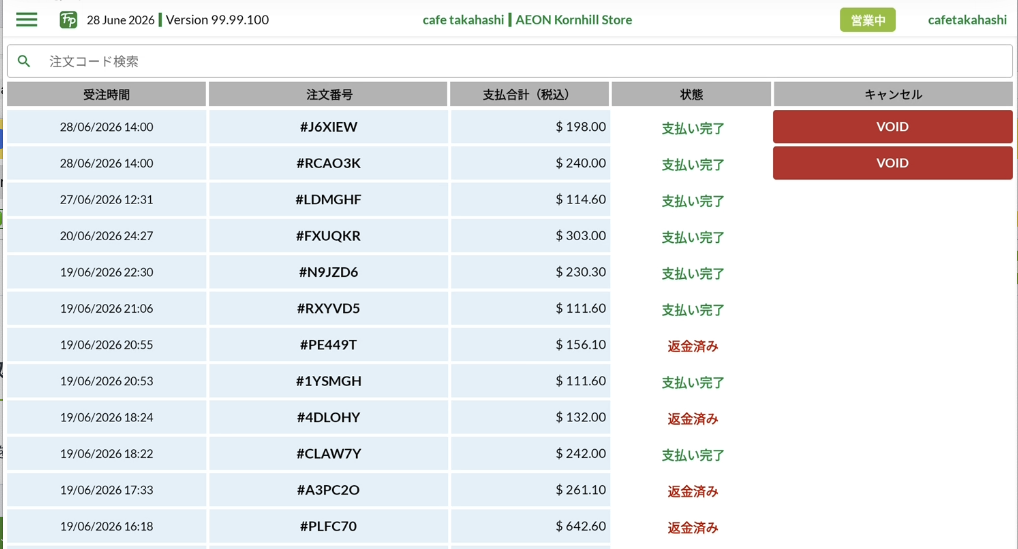
Here you can review processed orders and perform cancellations. First, select [Processed Orders] from the navigation menu.
6.1Reviewing Orders
- To review an already-processed order, tap the order number in the order list.
- The receipt contents of the order are displayed. Here you can check the order number, date, product names, amounts, payment method, and so on. Tap [Receipt] to reprint it.
6.2Cancelling Orders
- If for some reason you want to cancel an ordered product, tap the [VOID] button next to the order you want to cancel.
- Select the cancellation reason (Order mistake / Complaints / Others) and tap [Cancel Order XXXX] at the bottom right. At that time, a cancellation slip is output. Print two copies; hand one to the customer and keep the other at the register.
Ch.7Eat-in Management
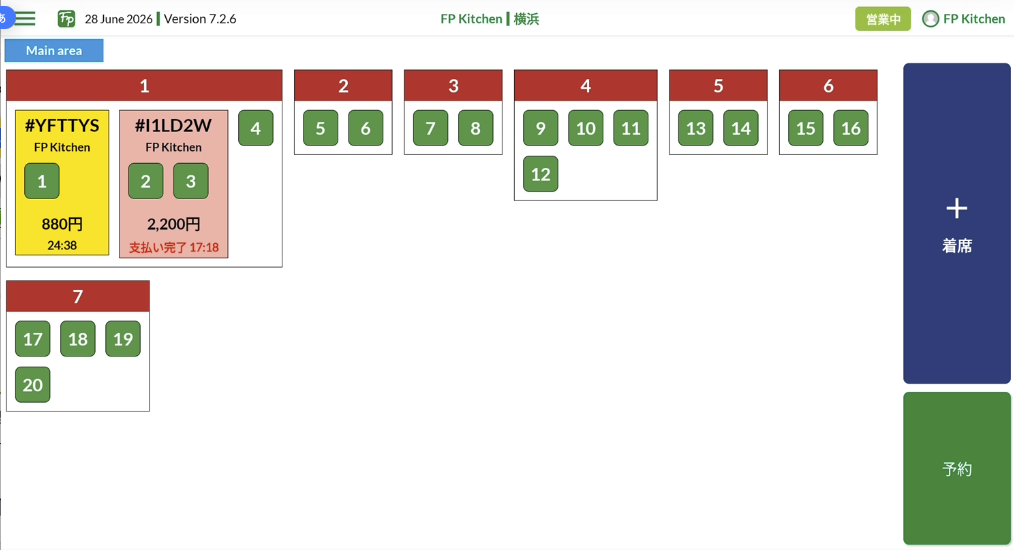
Eat-in management is used in full-service operations, where staff take orders after a customer is seated. This function serves to link the table number/seat number with the customer and the order information.
7.1Screen Components (in-store layout screen)
 1
2
3
4
5
1
2
3
4
5
7.2From Registering Tables and Seats to Taking Orders for In-store Dining
After a customer arrives and is guided to a table, register the table and seat using the following steps.
- Tap the seat number of the table you guided the customer to.
- Then tap [Seated].
- Select the seat number and enter the ordered products.
- Once you select the products, the product names are listed under the seat number.
- Review the details, and if they are correct, tap [Confirm order].
- The "bill" and "order slip" are output, and you return to the table screen.
- A bell chimes ("ding, ding"), and the ordered products are listed in the cart. This completes the order, and the order slip is output.
- If there are additional orders, tap [+ Order]. The order menu is displayed again.
7.3Taking Orders for In-store Dining
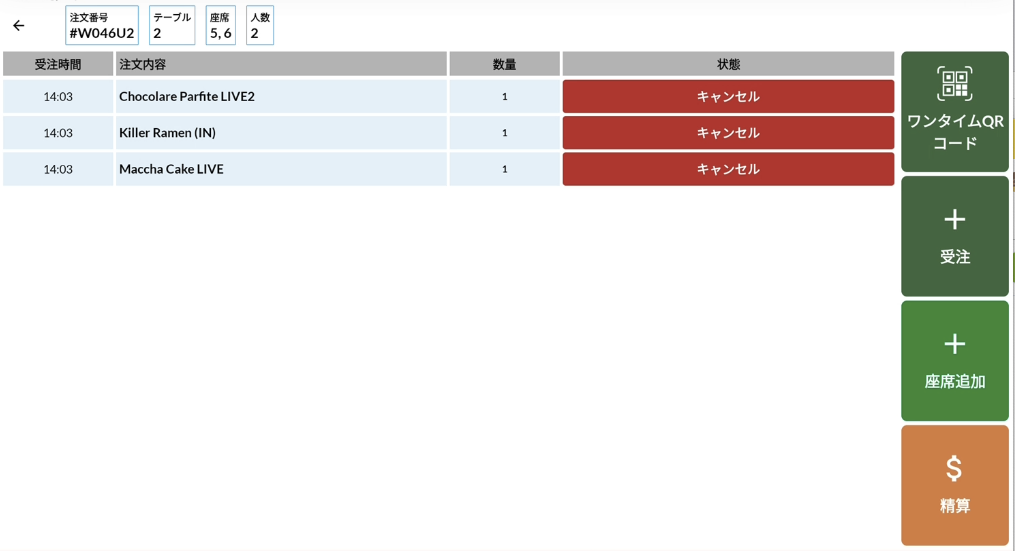
Orders are taken using the steps in 7.2 above. Once an order is complete, the order details (order time, order contents, quantity, status) are shown in a list on the order cart screen. You can cancel an individual order using [Cancel] on each row.
7.4One-time QR Code for Self-ordering
Foody Pocket allows customers to place orders from their seats using their own smartphones. To do this, output the one-time QR code linked to the table; scanning it with the Foody Pocket app displays the menu.
You can output it either by tapping "Print QR Code" at the top right of the order screen, or from "Print QR Code" in the order management dialog that appears when you tap the order cart.
- Tap "Print QR Code". The one-time QR code is output from the printer.
- Hand the printed one-time QR code to the customer.
- When the QR code is scanned, the menu is displayed and the customer can place an order.
7.5Adding Seats for In-store Dining
- To add a seat, tap the order cart of the table you want to add to, and display the order cart screen.
- Tap [+ Add Seat] on the right.
- "Available Seats" is displayed, so select the seat to add and tap [Continue To Add More Dishes] at the bottom right.
- The seat is added, and the added seat appears in the per-seat order screen.
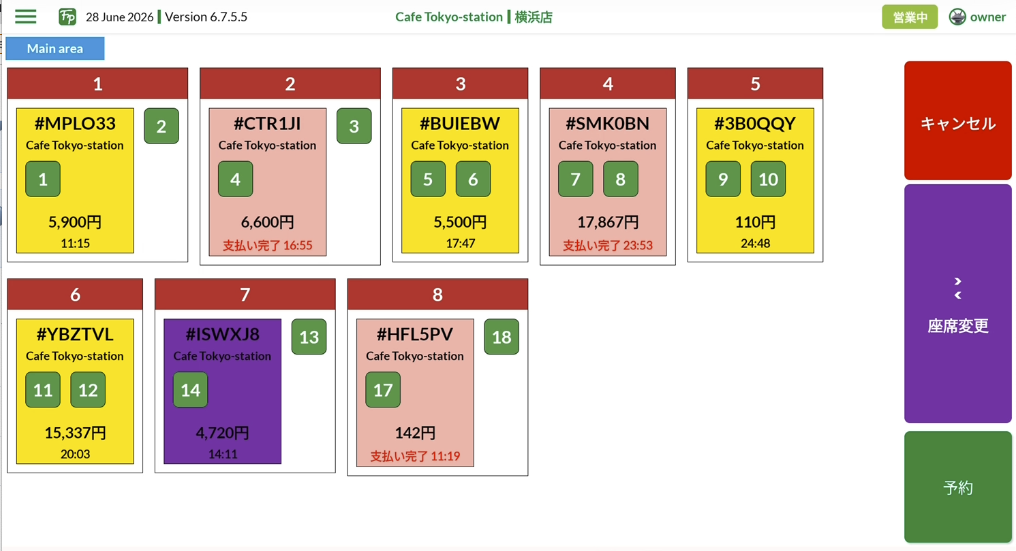
7.6Seat Change
This is a function to move an order that has already been seated and taken to a different seat. Long-pressing the order cart (yellow box) displays the "Order Management" dialog, from which you can operate Seat Change, Combine Bill, Un-combine Bill, Settle, Order details, and One-time QR Code.
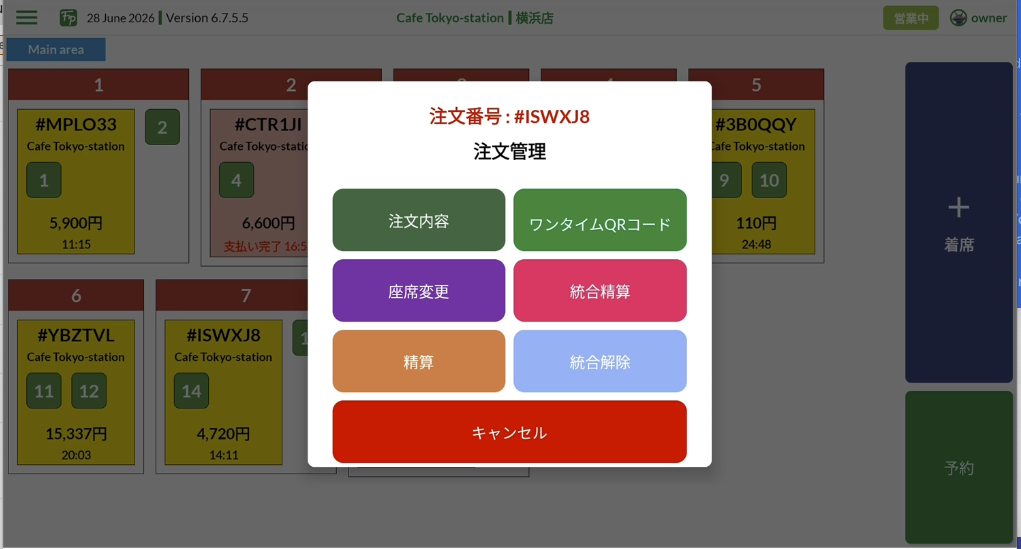
- Long-press the order cart (yellow box) you want to move to open the "Order Management" dialog.
- Tap [Seat Change].
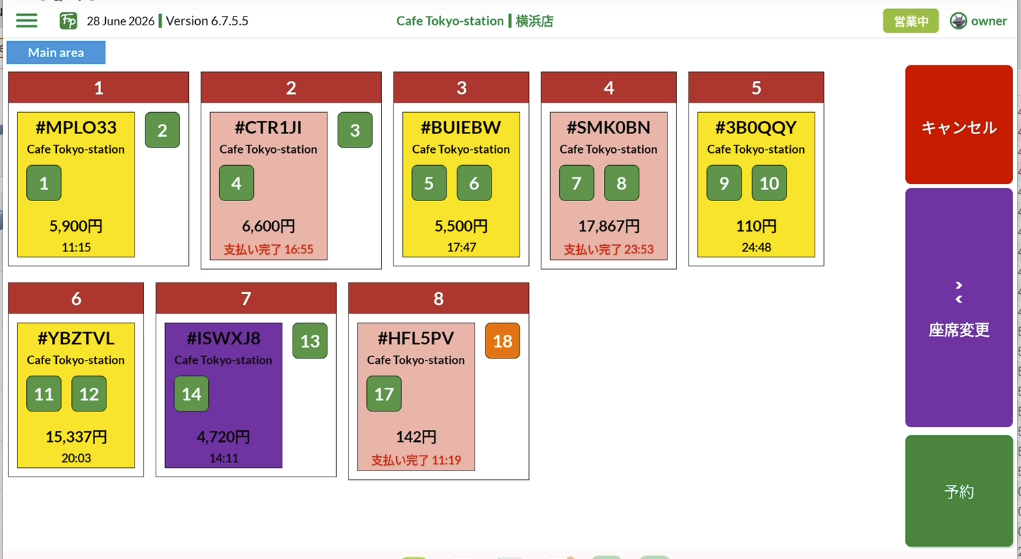
- Select the destination seat on the table screen. The selected seat is highlighted.
- Tap [Seat Change] on the right side of the screen.
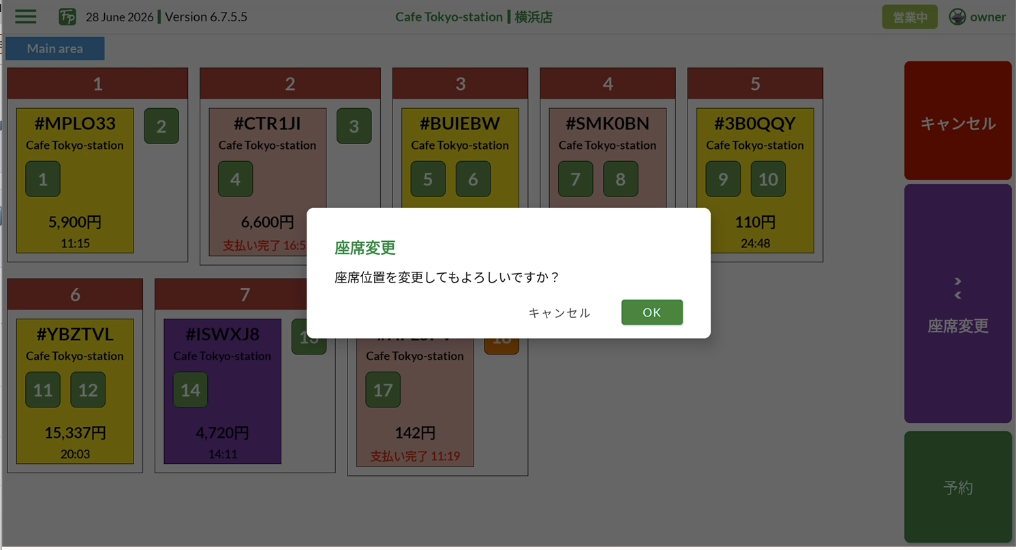
- You will see "Are you sure you want to change the seat position?", so tap [OK].
7.7Combine Bill
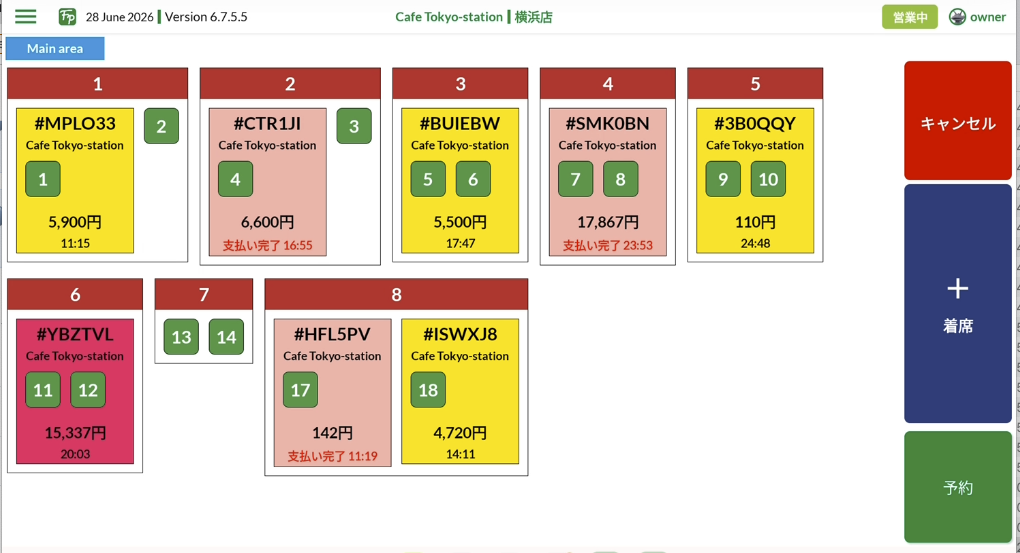
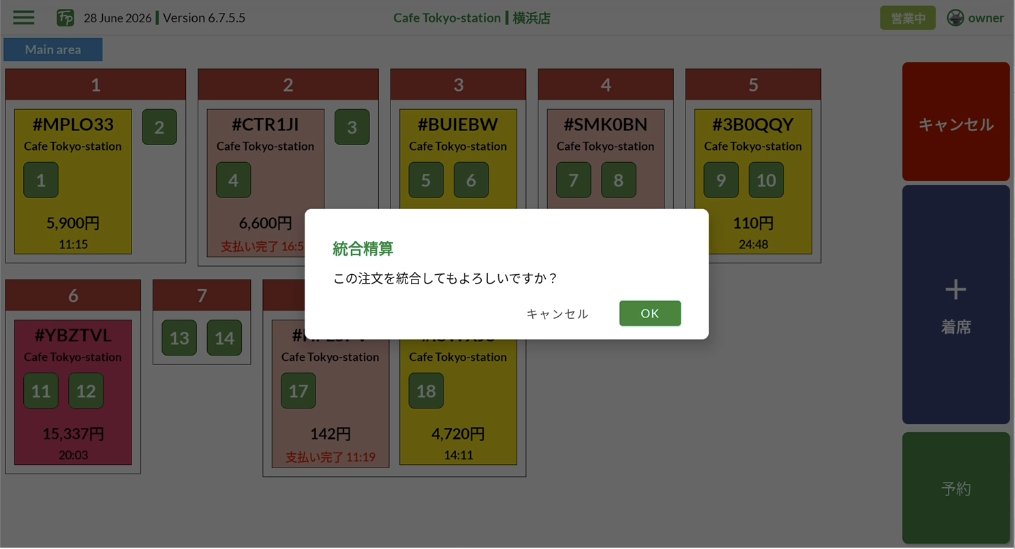
This is a function to combine multiple orders (carts) into one for settlement. Use it when you want to settle orders from separate seats/carts together. It is performed from [Combine Bill] in the "Order Management" dialog. To undo the combination, use [Un-combine Bill].
- Long-press any order cart (yellow box) to open the "Order Management" dialog, then tap [Combine Bill].
- On the table screen, select the order (seat) you want to combine.
- You will see "Are you sure you want to combine this order?", so tap [OK].
- After combining, you can settle them together (for the settlement method, see 7.8).
7.8Settlement for In-store Dining
- To process a payment, tap the order cart of the target table and display the order cart screen.
- Then tap [Settle].
- Review the ordered products and prices, then tap [Pay].
- Select whether to pay by cash or by payment device.
- For "Cash", enter the amount received into "Amount Received". When entry is complete, tap [Pay] at the bottom right.
- For "Payment Device", tap the payment method name on the left, and enter the amount in the number field to its right. For credit cards, QR codes, transportation IC, and QUICPay/iD, you can simply tap ↓ to enter the payment amount automatically. Only for cash coupons and cash can you enter the amount from the keypad on the right.
- When settlement is finished, be sure to tap [Paid / Close]. The table is released.
- If you want to hold the table after settlement, for example while clearing it, tap [Close]. The box turns pink on the table screen and shows the words "PAID". To clear it, tap the pink box again and tap "Settle" then "Paid / Close".
Ch.8Reservation ManagementIn development
With Foody Pocket, you can take reservations using the Foody Pocket BYOD app. The currently envisioned operation flow is as follows.
- Tap the seat number of the table that has a reservation.
- Then tap [Reservation].
- A calendar is displayed, so select and tap the date of the reservation.
- Tap [Add a new reservation] at the bottom right.
- Tap "Seats", select the seat number, and tap [Select].
- Enter the customer name. Tap "Customer". A customer list is displayed. For a new customer not in the list, tap the (+) button at the top right to register the customer (customer name, address, email, phone number, customer description).
- Confirm that the seat has been entered, then enter the reservation start time and reservation end time.
- Slide the dialog up with your finger and tap the [Update Reservation] button.
Ch.9External Order ManagementInternal testing
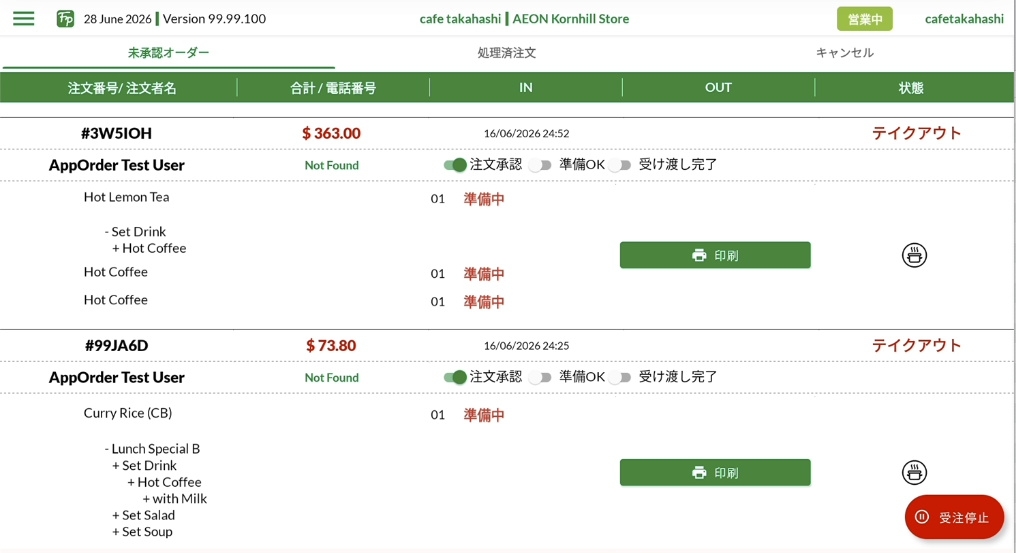
This is the feature for managing orders from outside the store, such as take-out and self-delivery. From the menu, select [Order Management].
9-1. Screen Components (external order screen)
 1
2
3
4
5
6
7
8
9
10
1
2
3
4
5
6
7
8
9
10
9-2. Receiving Take-out Orders
When a take-out order comes in, it is received by the POS via a push notification. In response to that signal, the order details are displayed on the POS and, at the same time, the order slip is output from the printer.
- When an order comes in, a chime ("ding") sounds, the order details appear at the top of the list, and the order slip is output.
- Review the details, and if there are no problems, slide the "order accepted" action button.
- Tap the estimated time until ready (5 min / 8 min / 10 min ... 40 min) and "accept the order".
- After cooking (preparation), once the product is ready to hand over, slide "ready for pick up".
- Once you have handed over the product, slide the "handover complete" button.
9-3. Receiving Self-delivery Orders
When a delivery order comes in, it is received by the POS via a push notification. In response to that signal, the order details are displayed on the POS and, at the same time, the order slip is output from the printer.
- When an order comes in, a chime ("ding") sounds, the order details appear at the top of the list, and the delivery order slip is output.
- Review the details, and if there are no problems, slide the "order accepted" action button.
- After cooking (preparation), once the product is ready to hand over, slide "ready for pick up".
- Once you have delivered and handed over the product, slide the "handover complete" button.
9-4. External Order Actions and the State Transitions in the Customer's Smartphone App
You perform the three actions "order accepted", "ready for pick up", and "handover complete" during an order. The actions and the corresponding order-state transitions in the smartphone app are as follows.
| POS-side action | State in the customer's smartphone app |
|---|---|
| (no operation) | Awaiting order acceptance. Payment is on hold. |
| Order accepted | The order is accepted, and it shows that preparation is in progress. |
| Ready for pick up | Preparation complete. It advances to waiting for pick-up (or delivery). |
| Handover complete | Handover complete. A notification of order completion is displayed. |
9-5. Temporarily Stopping External Orders
When you are busy or short on time, you can temporarily stop receiving orders from outside the store.
- Tap [Stop Receiving Orders] at the bottom right.
- A dialog is displayed, so tap [OK].
- External orders are temporarily stopped. To resume, tap [Start Receiving Orders] at the bottom right.
Ch.10In-shop Inventory Management
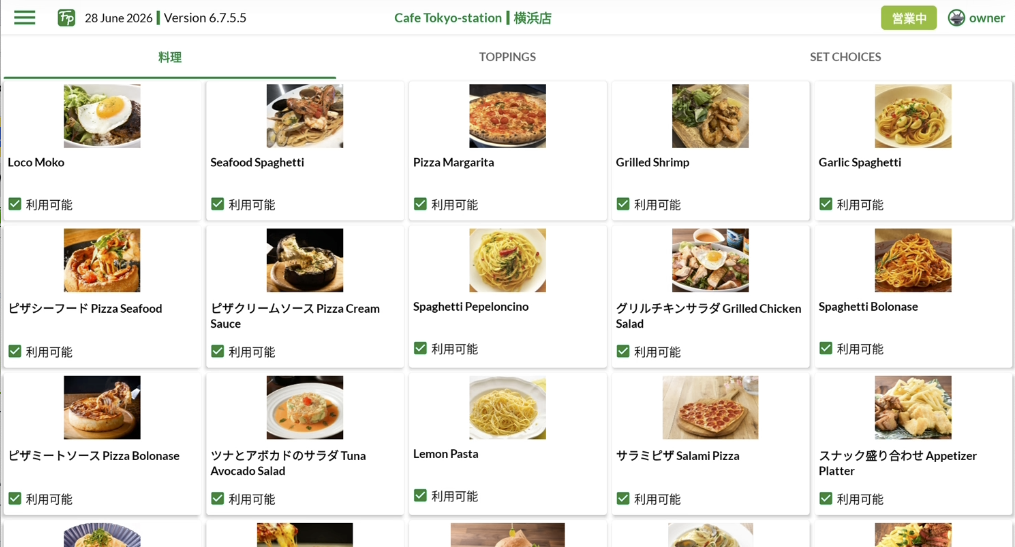
You can remove in advance dishes that cannot be provided due to ingredients or some other reason from the POS register and the mobile order menu. From the navigation menu, select [In-shop Inventory Management].
Click the checkbox of the "Available" button below the product box you want to remove. The product is dimmed (suspended). To make it available again, restore the check.
Ch.11Other Settings
From the navigation menu, select [Settings].
11-1. Enabling/Disabling the Self-delivery ServiceInternal testing
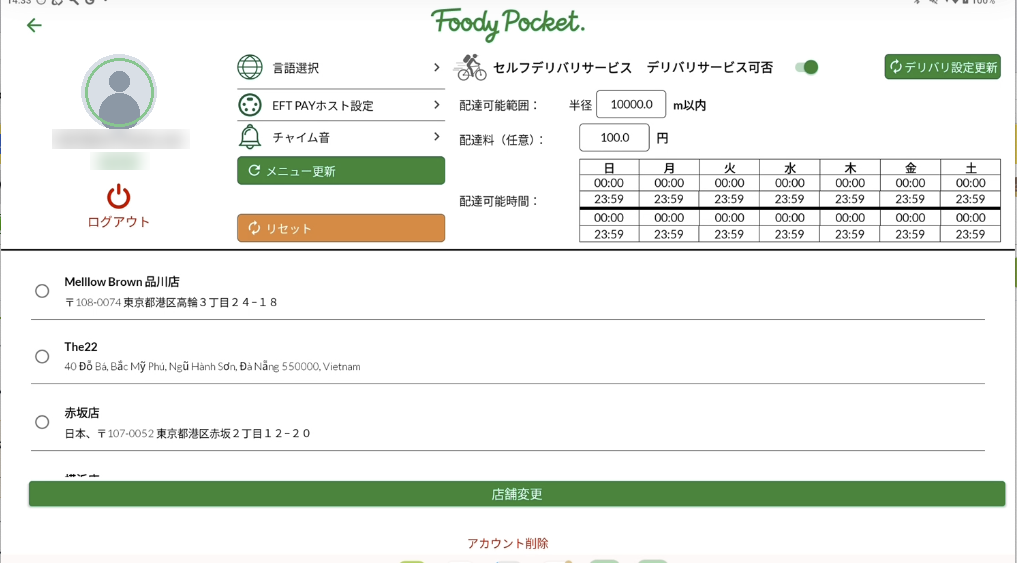
Self-delivery is a home-delivery system. It is a mechanism for having nearby staff make deliveries. You can enable or disable it to prepare for cases where you cannot provide the service due to staff shortages, busy periods, and so on.
- Tap the "Delivery service" button (toggles ON/OFF).
- When you are finished, be sure to tap [Update].
On the same settings screen, you can also review and configure the delivery range (radius), delivery charge, and the available delivery time slots by day of the week.
11-2. Changing the Branch
If you have admin privileges, you can select a branch.
- Tap the store name.
- Tap [Change Branch].
11-3. Signing Out
To sign out, tap the sign out button below the account name. Tap [OK] to "Are you sure you want to Sign Out?" to sign out.
Ch.12Handheld Devices
Foody Pocket POS supports order taking using a handheld device for staff.
| Item | Details |
|---|---|
| Supported devices | Android OS smartphone |
12-1. Preparation
To use a handheld device, you need to create a dedicated account for the staff member (order taker) on the Backend Console side.
- Select the "Staff List" in the Backend Console.
- Tap [New] at the top right of the screen.
- A dialog is displayed. Enter the user name, user email address, and password, select "Store Staff" for the role (Office Manager / Manager / Store Staff), select the applicable store, and tap [Save].
12-2. Screen Components (handheld order screen)
Cafe Takahashi
12-3. Taking Orders on a Handheld Device
For the order-taking steps, refer to "7.2 From Registering Tables and Seats to Taking Orders for In-store Dining". The basic flow is the same as POS register eat-in.
12-4. Registering a Printer
To output order slips from a handheld device, you also need to configure the printer on the handheld device side. Add it following "4.2 Printer Settings".
AppendixAppendix
A. Frequently Asked Questions
| Question | Answer |
|---|---|
| I can't log in. | Logging in requires three pieces of information: the "Work Space name", "Login ID (email address)", and "Password". These are obtained when you create an account in the Backend Console (Chapter 2). |
| The app is showing in English. | The display defaults to English. From the navigation menu > Settings > Change Language, select "Japanese" (or your language) and tap OK (4.1). |
| The print test isn't being output. | Check whether the printer's IP address is correct and whether the LAN connection is active. We recommend LAN over Wi-Fi for connections (4.2.1). |
| Order slips don't come out of a specific printer. | Check that a printer (main/secondary) is assigned to the target category in the assignment settings, and that "Order Slip" is selected on the output printer (4.2.2). |
| The reduced tax rate for take-out isn't being applied. | Tap the "TAKE OUT" icon in the tax column of the selection list. The default is the standard tax rate (10%) (5.2). |
| I can't select a discount on the entire sale. | If an individual product discount is applied, a discount on the entire sale cannot be combined with it. Remove the individual discount and try again (5.3). |
| I can't close the register. | If you are logged in on multiple POS/handheld devices, you cannot close the register until you log out of all of them (4.3.3). |
| I want to cancel an order but can't. | Cancellations can only be made for orders placed on the same day. Orders carried over to the next day cannot be cancelled (6.2). |
| In eat-in, the table doesn't free up. | Tapping "Paid / Close" after settlement releases the table and seats. If you leave it at "Close", it stays in the held (PAID) state (7.6). |
| I want to temporarily remove a product from the menu. | From the navigation menu > In-shop Inventory Management, uncheck "Available" for the target product to hide it from the POS register and the mobile order (Chapter 10). |
B. Glossary
| Term | Meaning |
|---|---|
| Work Space | The account unit for a store (business). This name is required when logging in. |
| POS Register | The screen where staff take orders and settle face-to-face with customers (for self-service operations). |
| Eat-in | In-store orders in full-service operations. Orders are managed by linking them to tables and seats. |
| Handheld device | An Android smartphone device used by staff to take orders at the table. |
| Drawer (cash drawer) | The drawer that holds the register's cash. Deposits and withdrawals are recorded in cash management. |
| Change float | The cash for making change that is placed in the drawer before business starts. Registered using "Add Cash". |
| Settlement Daily Report | A daily report recording sales, average spend per customer, the breakdown by payment method, and so on. |
| One-time QR code | A QR code for self-ordering that is linked to a table. It expires once payment is completed. |
| Self-delivery | A home-delivery mechanism in which nearby staff make deliveries (in internal testing). |
| Printer assignment | The setting that assigns the output printer (main/secondary) by category and by location. |
| BYOD / mobile order | A mechanism for customers to order on their own smartphone (the Foody Pocket app). |
| EFT PAY / STORES payment | Payment terminals that link with the POS. EFT PAY is supported in Hong Kong, and STORES payment domestically. |
| VOID | The operation to void (cancel) a processed order. |
| Reduced tax rate (TAKE OUT) | The tax rate applied to take-out, self-delivery, etc. (8%). Eat-in is the standard tax rate (10%). |